Showing posts with label Tuesday Tutorial. Show all posts

Thursday, December 15, 2011

Tuesday Tutorial

It's Thursday. Get over it.

Happy Tuesday, everyone! (See? Now your brain is all, "Tuesday?  No, that's not right....Oh.  Wait, it's Thursday-only one more day of work! Yessssss.") 
Today, I will teach you how to make a salt scrub. Why would you want a salt scrub?  Because it gets rid of yucky dry dead skin bits.  Why would you make one, instead of just shell out $10 to buy one?  Because you are addicted to Pinterest, and have tons of recipes piling up, and because you're a crafty motherfucker.  Not crafty as in, "Getting away with seeing 2 guys at the same time behind each one's back but then one shows up on your doorstep with donuts and coffee for you and your roommates to be sweet, but you aren't there, because you are with guy #2 (at *ahem* 6:30 am) because guy #1 wasn't supposed to drop by because he lives 2 hours away and now the jig is up" crafty.  More along the lines of "Macaroni and glue and paint and pipe cleaners and glitter---*POOF* now it's a toilet paper cozy" crafty. Clear? Good.

So, you get some salt.  We are talking cheap-ass 2/$1 salt from the dollar store.  Shhh. Then you need some oil. I use food-grade.  Not because I eat in the shower-that would be a whole other post.  I use food-grade 'cause it is cheaper than cosmetic grade.  See? Crafty. You need some yummy smelling essential oil. And maybe a lil sompin sompin to add in. I will get to that part in a sec.

Gather your crap:


You will need containers to put the scrub in.  I'm a fan of glass, because I don't like plastic.  It's a thing.  If you are clumsy, you may want to use plastic.  Or if you are cheap.  Or if you hate the world.

First, pour the salt into the food processor, or your super amazing blending machine, the Ninja 1000.  Vrooom!  This is to make the salt finer than it is.  The directions said so (not to throw it in the blender-that's me being spontaneous.  The directions said to use fine sea salt, but I figured that was expensive so I used regular salt). Oh, and the smoke coming out of the sides of the processor?  Probably not smoke. It's (look for flames just in case-I don't want to be blamed for starting some awful fire because I told everyone smoke was normal, and besides, I totally declined blog insurance-is that even a thing?) fine plumes of salt. It looks cool though, and you can be all, "Hey kids! Look, a fire!!"  Then you can not move and just stare at them, while they try to decide whether to panic. And then you can say, "Ha.  Just kidding". And then they end up in therapy.

Once you dry Princess's tears and promise never to joke about major catastrophes again, you take the salt and pour it into a bowl. About 2 cups. Then, add the same amount of oil.  (2 CUPS, don't you ever pay attention?) Right here is where you will notice the difference between food-grade and cosmetic-grade.  I used grapeseed oil. And it came out green.  Which worked, because I was doing a citrus blend.  It would have sucked had it been lavender, or vanilla or something. So, check out the oil first, make sure it does not have a color, unless you are okay with that.  Usually almond oil is a good choice as well. Then put in the scent-I used about 30 drops of grapefruit essential oil.  I mixed it, then added about a 1/2 cup more salt, because it seemed to runny.  And, I'm spontaneous like a motherfucker.
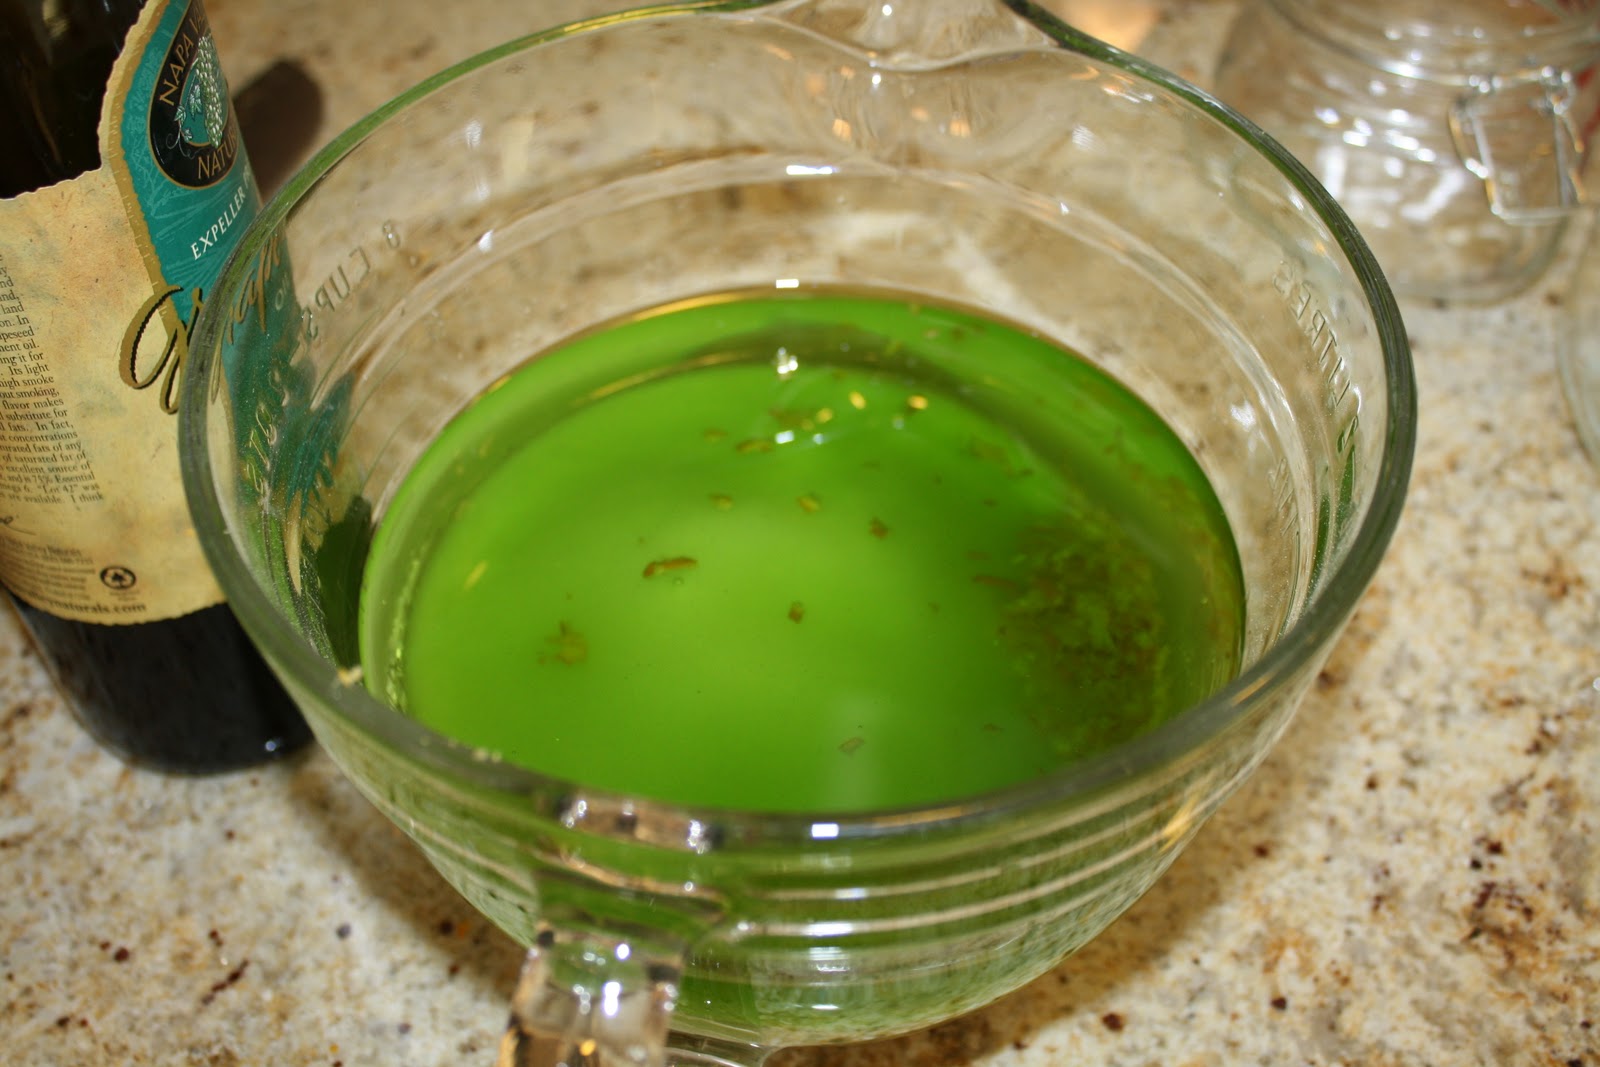
Holy shit!  The oil is green.

 It looks better mixed up.  But it still looks like pistachio pudding-let's cram some more salt into it
 Pretty jars
Getting my rind on-I'm cool like that, adding real tangerine peel like a badass


Then, to be WHIMSICAL (I fucking HATE that word, and so does Sky King-but I am contrary like a motherfucker, too, so deal) I added some itty bitty bits of mandarin orange rind.  Then I threw it all in the blender thingy again, for good measure.  Pour into glass containers, and BAM.  Salt scrubs.  You could make a pretty label on the computer.  Or, you could hand it to people, and be all ghetto, "Dude.  I made this. Don't eat it.  It's a salt scrub." Either one.

Sunday, November 27, 2011

Tuesday Tutorial #2

Yeah, I know it's not Tuesday.  Pretend it's Tuesday.  Like, if you were in Australia. And it was Tuesday. or, you woke up after a head injury and you were unsure what day it was. No?-I have chronic pain, asshole. Show some compassion. Damn.  I'm not even sure I want to show you my bad-ass idea now.

:::sulk:::

Fine. Just because you're a jerk doesn't mean the world should suffer without my awesome craftiness.  As you know, because you spend most of your free time hanging on my every word, my kiddos both go to an amazing Montessori Charter school for 2nd and 7th grades. Each Christmas, I try to come up with fun gifts for the teachers.  I avoid the usual junk-things based on pencils, note pads, apples. I usually steer clear of bath and body items as well-I'm sure many people will do that. As a former teacher, I know what I wanted to get and that was gift cards, or cash. Some schools have policies on cash, and the OCD crafter in me can't do it, unless it's done super-creatively. Since I suck at money origami, I do gift cards.


Monkey Boy has three teachers-they rotate from room to room like traditional middle schools, but electives are taught by volunteer parents and there are only 3 staff members, so still the close-knit community that I love.
I figured out a creative way to give gift cards! First, you take a reusable insulated cup, and place a gift card inside.


Set it on it's side, and put in some crap to hold the gift card still.  I used some re-purposed (that's fancy talk for garbage) bows that are curly and not too smooshed. You could also use confetti as a passive-aggressive way to be mean. We all know no one likes confetti. Except janitors that get paid by the hour. Or raffia if you have it.  Or maybe crumple up some of your child's best work, and stuff them in there. Although that may send the wrong message, like maybe you think they gave your kid good grades because you give awesome gifts.
Anyways, cram some stuff in there, otherwise it looks just like you threw a Starbuck's card in a cup. Which would be rude. Unless it was a $100 gift card.  Then, you can pretty much throw it at them. I know-I was a teacher, and I had no shame when the gift card amount was high. I'm a professional, y'all.

Then, you put a couple more in there, 3 fit nicely.

Now remember, my kids are pretty much total train wrecks, so I go big. 3 teachers, 3 gift cards for $10 each card, plus the cup.  Maybe you have good kids. If that is the case, you could do something different, like 3 cards of $5 each, in a card. Or maybe you are just a cheap unappreciative asshole. Or you are only doing a gift because you don't want to look like a jerk, but you really don't like the teacher. In which case, just buy them some crappy body wash from the grocery store, asshole.

Of course, if you like me and my blog, you probably have rotten kids too. Or, you think I make all this shit up for your amusement.  if that's the case, yes, I make this up.  I'm that creative. My kids are really quite sweet, and I got each teacher a $3 Whitman's Sampler.  Moving on.

So, the cup should look like this:


I used 3 different food gift cards.  Because themes kick ass. Then, I'm going to attach an awesome little fancy note that will say something cute.  Because my gifts are the bad-ass rock stars of gifts.  My gifts show other gifts what's up. They have throngs of scantily-clad other gifts following them, throwing their bows at them....wow. That just got weird.   What I'm trying to say is that, I rock as a gift-giver. You'd be lucky to get a gift from me. That's all.
Anyways, back to the card. It will be something like,

You spend each year feeding the minds of the children. Now, we will return the favor! From: The coolest family everpleasedon'tfailmykid.

I haven't done it yet, because I was doing this blog, trying to please you.  Stop judging me. 


You throw it all into a wine gift bag, and, voila!


Yes, you may steal. You're welcome.


Tuesday, November 8, 2011

Tuesday Tutorial

Okay, crafty people!  I like to do crafty stuff. Well, it's more like, I like to think about doing crafty stuff, buy all the equipment, then get halfway through, run out of energy, then shove it aside to be trashed by me a few years later.
This time, however, was different.

I have found Pinterest. This is a website devoted to people that are crazy about finding crap online. You find the crap, "pin" the picture to a board, and you have it forever. It's like a cross between a visual Twitter (people can "follow" you) and a visual bookmark system. You can categorize things into categories, creating as many boards as you like. For instance, I have:
  • Products I love
  • Crafts I want to try
  • Fall ideas
  • Stuff I want-hint, hint, honey
  • Sayings I like
  • Ideas for the kids' school
  • Ideas for my work
If I have not explained it to the point of you wanting to be all over it RIGHT NOW, I did a lousy job explaining it.  Anyways, I found some neat things I liked recently. Okay, A LOT of neat things. So I pinned the ones I liked, then fell ill with a crafty bug this weekend.

Here is the inspiration:


So I got a W. Then, I couldn't find twine, so a finally settled on Fall colored yarn. 
W's suck.  I had a hell of a time winding that yarn around, burning my damn fingers with the hot glue, you name it.  So I chilled for a bit, thinking.
I went to the craft store for the fabric for the rosettes. The rosettes I didn't know how to make. While there, I came upon the idea for ribbon, with buttons to cover the glue for the ribbon. Finally happy with the W. Then it was on to the rosettes.
I couldn't find a website I had patience for, so I gathered a couple ideas from a couple places, and figured I would wing it.
I had bought a "quilter's pack" or something-a group of 5 fabrics all with coordinating colors. I figured pattern didn't matter much, because they would be rosettes, not flat fabric. Then, I stripped the fabric by making notches, then ripping the fabric which gave it an unfinished look. The strips were about 1-1 1/2 inches wide, and there is a certain direction to rip in. I tried both, went with what is easier. Google it if you want a more precise description. Hell, Google a real crafter if you want a better description-you're the one taking advice from ME.

Here is a pic of the notches before I got to rip the fabric. Incidentally, ripping fabric makes a very satisfying sound.  It could become a positive aggression outlet....


Notice the fake acrylic nails-these will come in handy when the real gluing begins...

Then, a made a circle out of fabric, to glue the rosettes to. Later, I found that cardboard was better (crappy paperboard from the kids' cereal boxes will be fine-use different sized cups as templates.) And, you wastes less fabric. so I created strips, then scrunched up an end, glued it to the center of the fabric or cardboard circle, and twisted the fabric into a, a, a,   twisted strip of fabric. How else do I say that? My first one wasn't very twisted, and it turned out crappy. I fixed it a bit later....


Crappy first rosette.  I kept winding and gluing, winding and gluing, using my acrylic nails to hold crap in place while the 2000 degree glue dried.
I sat washing anti-depressants down with boxed wine, watching Monday Night Football while I made rosettes until I couldn't stand it any more.
As soon as my fingers were aching, I stopped. Then, I slapped those rosettes onto a grapevine wreath, along with the W and some ribbon to hang it. Glue is the secret to this craft, by the way.
Voila!


the crappy rosette is the bottom one, can't even tell, can ya?

I'm one crafty mo-fo, right?

I might add more rosettes later, when my fingers get their feeling back.  I probably won't, though.